
- What Is The Two Bucket Method To Wash Car Properly - July 2, 2021
- 5 Best Car Seat For Grandparents That Impress Your In Laws - May 18, 2021
- 5 Best Rooftop Cargo Box For Audi Q5 [Review & Buying Guide] - May 11, 2021
Last Updated on September 7, 2023 by Chase Manhattan
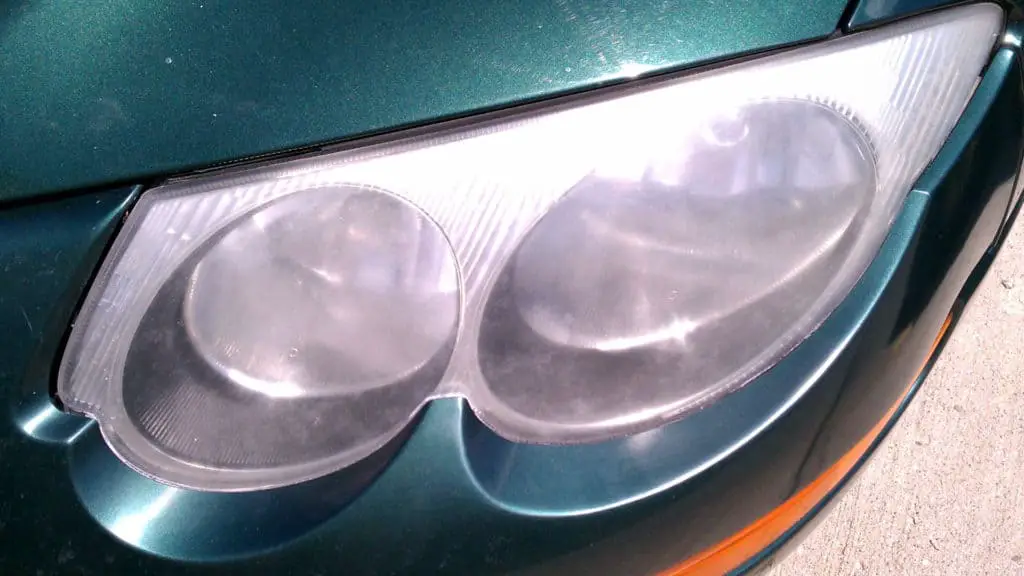
The appearance of a spotless car will be completely ruined if it’s headlights are faded and yellow.
Faded headlights are not only unattractive but also quite dangerous. They prevent your headlights from shining brightly onto the road in front of you.
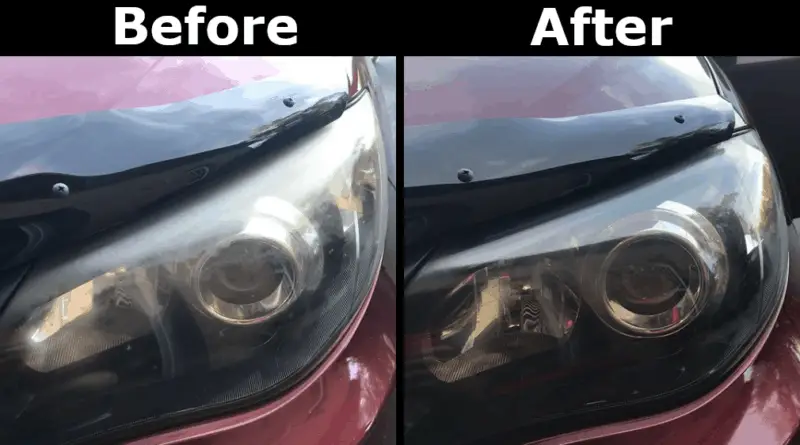
Cleaning faded headlights, or fixing headlights with heavy condensation, can be extremely quick and easy. The first method is using a car plastic restorer to clear up foggy headlight. If the first method is not effective, you will need a restoration kit like the 3M Headlight Lens Restoration System.
IF you are keen to find out about both of the methods, read on as we elaborate on each method.
[Suggested Article: 7 Ways to Remove Wax from Your Windshield]
Quick Navigation
How to Restore Headlights Permanently
There are two different ways to restore headlights.
Although the first one is simple and can take less than a minute, it may not fix all foggy headlights.
You should attempt the first method before continuing to the second method, which is more intensive. With auto detailing, you should always try the least intensive method before continuing to something more.
[How To Remove Scratches From Black Plastic Bumpers]
Method One
This simple and quick method involves using a car plastic restorer to clear up foggy headlights and can take less than one minute.
Although this will often fix (or dramatically improve) many faded headlights, some will require a deeper restoration (the second method).
It is highly recommended you start with this simple method, then moving onto the next if it doesn’t produce the desired results.
<a href=”https://www.dpbolvw.net/click-100952348-13739068?url=https%3A%2F%2Fwww.chemicalguys.com%2Fheadlight-lens-restorer-protectant%2FGAP11516.html&cjsku=GAP11516″ target=”_top”>
Car Headlight Lens Restorer And Protectant Helps Remove Oxidation And Makes Dull Car Headlights Come Back To Life! | Car Headlight Restoration | Chemi</a><img src=”https://www.awltovhc.com/image-100952348-13739068″ width=”1″ height=”1″ border=”0″/>
What You’ll Need
- Meguiar’s PlastX
- Microfiber towels
- Car wash soap
- Paste wax

Step One – Wash the Headlights
Make sure the headlights are clean and dry before beginning the restoration process.
- Wash the headlights with soapy water.
- Rinse with water to remove the soap.
- Dry the surface with a microfiber towel.
If your car was just washed, double check to make sure the surface is completely clean and dry.
If bugs or embedded dirt are present, use a clay bar system to remove these contaminants before continuing.
Step Two – Restore the Headlights
- Apply a quarter-sized amount of Meguiar’s PlastX to the microfiber towel or foam applicator.
- Rub thoroughly onto the faded surface of the headlight using moderate pressure.
- Finally, wipe the excess product with the microfiber towel before it dries.
Read more: Best Clear Coat for Headlights
Be careful not to get the product on the body of the car, as this can cause damage the clear coat. Mask off the area with painter’s tape to be safe.
Check for the improvements to the clarity of the headlight housings. You will likely have to pass over the faded headlight several times for the best results.
[Stop Rust From Spreading on Your Car’s Paint]
If the headlights are still faded after 2-3 treatments, skip to Method Two!
Step Three – Apply Wax Protection
After cleaning faded headlights, it is highly recommended to protect them! Without protecting, they will quickly become faded again.

To protect your headlights from fading, apply 1-2 coats of paste wax. Re-apply wax coats often for long-lasting protection. UV protection coating can also be applied to last longer than wax.
Without some sort of protection on the headlights, they will become faded and damaged just like they were before.
Additionally, try to avoid parking in direct sunlight, as this will help stop the penetrating UV rays.
Method Two
If the first method was not effective, your headlights have deeper damage that must be repaired using more advanced techniques.
Although it is more advanced, it can still be done at home without any experience!
What You’ll Need
- 3M Headlight Lens Restoration System
- Microfiber towels
[Most Common Causes of Scratches on Your Car]
The Process
You’ll need to follow the specific steps provided by the kit, although I give an overview of the steps below.
You may also watch this video to help through the process. Although the video is old, it is still relevant and very useful.
Step One – Apply Surface Activator
Spray the surface activator onto the headlight, covering it completely and let sit for 30 seconds before rinsing with water.
This helps remove yellow staining and softens remaining UV protection on the headlight for easier removal and polishing.
Step Two – Sand and Polish
Use various grit levels of sandpaper and polish to remove the cloudiness from the headlights.
This gets rid of the damaged surface, revealing a new, clear surface.
Step Three – Apply UV Block Clear Coat
Apply UV block to the headlights to finish the surface of the lens. This adds final clarity to the lens.
Additionally (and most importantly), the UV block will prevent UV rays from damaging your headlights again in the future.
[11 Benefits of Waxing Your Car]
Why Do Headlight Housings Fade?
Headlight housings are made of polycarbonate plastic, which is lightweight and very tough . Unfortunately, this plastic can be damaged by ultra-violet (UV) rays from the sun.
Car manufacturers apply a UV ray protection film over the plastic, but this film gets damaged and disappears over time, allowing fading and yellowing of the plastic.
Therefore, faded headlights are commonly seen on older cars.

Luckily cleaning faded headlights is typically very easy, quick, and requires very few materials.