
- How to Clean Car Carpets Quickly (Without An Extractor) - July 10, 2024
- Can You Touch Up Clear Coat On A Car? Yes and No (Here’s Why) - November 25, 2023
- How To Wax A Car By Hand (For Beginners) - November 14, 2023
Last Updated on January 1, 2025 by Nate Schnell
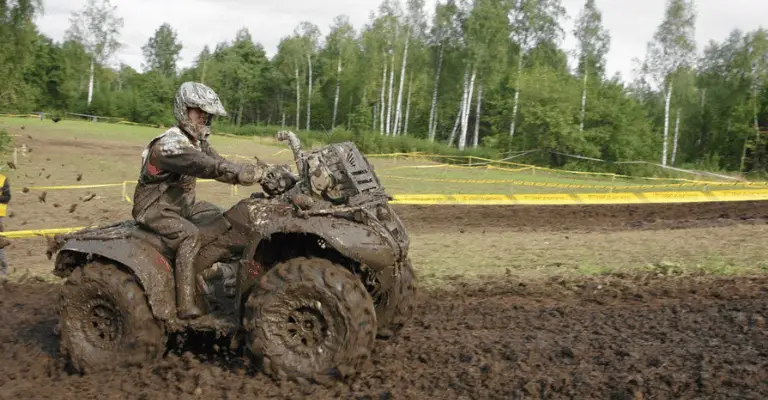
ATVs are designed to tackle rugged terrains, from muddy trails to sandy deserts. While they excel at handling tough environments, they often end up covered in dirt, grime, and debris. Proper cleaning is essential to maintain their performance, extend their lifespan, and keep them looking sharp. This guide focuses on how to detail your ATV, including using pressure washing and other effective techniques.
Why You Need to Clean Your ATV
Cleaning your ATV isn’t just about appearances. Dirt, mud, and debris can accumulate in critical areas, potentially causing long-term damage. Here’s why regular cleaning matters:
- Prevent deterioration of plastics and paint. Dirt and grime can wear down the ATV’s exterior over time, causing fading and scratches.
- Avoid performance issues. Accumulated dirt in sensitive areas, such as the suspension or drivetrain, can hinder performance.
- Protect against rust and corrosion. Moisture trapped by mud can lead to rust on metal parts.
- Prevent mechanical failures. Debris can enter the engine or clog the air filter, leading to costly repairs.
For example, excessive sand and dirt buildup can damage components like rear axle bearings, as experienced by many rental businesses operating in deserts. Regular cleaning can prevent such issues and keep your ATV running smoothly.
Things to Be Careful Of When Cleaning Your ATV
While cleaning is essential, improper techniques can cause damage. Keep the following precautions in mind:
- Avoid spraying electrical components. Cover sensitive areas like the ignition switch to prevent water damage.
- Protect trim and rubber. Maintain a safe distance when pressure washing to avoid tearing or warping rubber components.
- Work from top to bottom. This ensures dirt flows downward, preventing recontamination of cleaned areas.
- Allow full drying before use. Starting the ATV while wet can cause electrical shorts or other issues.
Step-by-Step ATV Cleaning and Detailing Process
- Pre-cleaning. Remove large debris using a rubber mallet or soft brush to knock off large chunks of mud and dirt. This saves time during washing.
- Pre-soak your ATV. Use a garden hose to spray the ATV with cold water, loosening surface dirt and grime. A thorough pre-soak helps make the main wash more effective.
- Main wash. Pressure washing is highly effective for ATVs. Use the strongest setting on your hose or a pressure washer with a broad tip to prevent damage. Focus on areas with stubborn dirt, but avoid high-pressure sprays on sensitive parts like seals or electrical components. Always check your owner’s manual before using a pressure washer, as some ATV models may have specific cleaning guidelines.
- Apply detergent for deep cleaning. Mix a mild automotive detergent with water and apply it with a sponge. Focus on oily and grimy spots that pressure washing may not have fully addressed.
- Scrub stubborn areas. For resistant grime, use a brush with thick bristles to scrub trouble spots. A toothbrush can be helpful for hard-to-reach areas.
- Rinse and dry. Rinse off the detergent with a garden hose. Use a lint-free towel to dry accessible areas, and consider using an air compressor or leaf blower to remove water from crevices.
- Degrease and apply rust inhibitor. For areas with oily residue, apply a degreaser and rinse thoroughly. Spray exposed metal parts with a rust inhibitor to protect them from corrosion.
- Clean the air filter. Remove the air filter and clean it with dish soap or a specialized cleaning solution. Rinse thoroughly, let it dry, and spray it with filter oil before reinstalling.
- Polish chrome and aluminum parts. Use a dedicated polish for chrome and uncoated aluminum parts. For coated aluminum, use a spray polish to enhance shine without damaging the finish.
- Buff plastic components. Apply a plastic polish to the ATV’s plastic parts. This not only enhances their appearance but also reduces scuffs and scratches.
Additional ATV Detailing Methods
While pressure washing is the go-to method for thorough cleaning, here are a few alternatives:
- Waterless wash. Ideal for light cleaning, waterless wash products allow you to clean your ATV without water.
- Foam cannons. Apply a thick layer of foam that loosens dirt, making it easier to rinse off.
- Steam cleaning. For an eco-friendly option, steam cleaners can effectively remove dirt without harsh chemicals.
Tips for Long-Term Maintenance
- Clean after every use. Prompt cleaning prevents dirt from hardening and becoming more difficult to remove.
- Store in a dry area. Keeping your ATV in a covered or enclosed space helps prevent rust and weather-related damage.
- Inspect for damage. Use the cleaning process as an opportunity to check for wear and tear on critical components.
FAQs About ATV Cleaning
Can I use a pressure washer on all ATVs? Most ATVs can handle pressure washing, but always check the manufacturer’s recommendations. Avoid using high-pressure settings near seals, joints, and electrical components.
How often should I clean my ATV? Clean your ATV after every ride, especially if it has been exposed to mud, sand, or water. Regular cleaning prevents long-term damage.
What’s the best detergent for ATV cleaning? A mild automotive detergent is ideal. Avoid harsh chemicals, as they can damage the ATV’s finish and rubber components.
Wrapping Up
Regular cleaning and detailing are crucial for keeping your ATV in top condition. By following the steps outlined in this guide, you can protect your vehicle from dirt, rust, and wear while ensuring it performs at its best. Whether you’re riding through mud or sand, proper maintenance will extend the life of your ATV and keep it looking great. Happy cleaning!